



Most factories chasing setup time optimization look at the wrong thing first. They stare at the sew floor, obsess over SAM and operator efficiency, and completely miss that a huge chunk of lost hours happen between styles — when a line stops, retools, re-threads, swaps feet and folders, re-cuts a marker, and waits for the next bundle to arrive at station one.
Changeover is where margin quietly evaporates. And the frustrating part is that it rarely shows up cleanly in any cost sheet. The hours get buried in overhead or smeared across a whole cut order, so nobody can point at a style and say "this one cost us 40 extra minutes of setup because we ran it in the wrong sequence."
This post covers exactly that: how to sequence SKUs so you retool less, how to build shared-tool checklists so the line isn't hunting for a binder at 7am, and how to build a season-level amortization workbook so your per-unit costs finally reflect reality.
The real cost hides in the gaps between styles
Here's the pattern in small and mid cut-and-sew operations. A line runs eight to twelve styles across a season. Each changeover eats somewhere between 25 and 90 minutes depending on how different the next style is — new needle size, different folder, a binder swap, new thread color across six machines, different pressing setup.
Nobody tracks these transitions as a line item. So when a style comes back as "low margin," the team blames fabric price or labor rate. In reality the style was fine — it just got slotted right after a completely unrelated garment, forcing a full teardown and rebuild.
A typical example: a line finishes a run of woven button-downs with specific collar and placket folders. The next style scheduled is a knit jogger. Everything changes — needles, thread, feed dogs, folders, pressing. That transition alone might burn 70–80 minutes across the line. Had the planner slotted another woven style next — even a different silhouette sharing the same folders and needle setup — the changeover might have been 20 minutes.
Same work. Same people. Roughly an hour of difference, created entirely by sequence.
Sequencing heuristics that actually cut setup time
You don't need an optimization engine to sequence better. You need a small set of rules the planner applies before releasing the week's cut orders. The goal is simple: minimize the total "setup distance" between consecutive styles.
Eliminate delays in your fashion production cycle.
GoTailo helps you manage designs, orders, and inventory effortlessly, keeping production on schedule.
- Centralized order and inventory management
- Real-time supplier communication
- Integrated production scheduling
No credit card required
Think of setup distance as the sum of everything that must change to move from Style A to Style B:
-
Needle type and size
-
Thread type and color (per machine)
-
Folders, binders, guides, feet
-
Machine type mix (lockstitch, overlock, coverstitch, bartack)
-
Pressing and finishing setup
-
Marker/cut geometry on shared cutting tables
A practical heuristic set that holds up on real floors:
1. Group by tooling family first, color second. Styles sharing the same folders and attachments should run back-to-back, even if that means running a navy top right after a white top. A thread color change across the line is usually 10–15 minutes. A folder swap plus re-timing can be 30–45. Tooling beats color almost every time.
2. Sequence from light to dark within a tooling family. Once you're inside a family, order by color so you're adding darker thread progressively. This avoids the worst case: running white after black and spending extra time clearing lint and dark fiber contamination.
3. Save the "orphan" styles for a dedicated block. Every season has two or three styles that share tooling with nothing else — a specialty garment, an odd trim, a one-off construction. Don't scatter them. Cluster them into a single changeover block so you pay that teardown cost once, not three separate times.
4. Match cut-floor sequence to sew-floor sequence. This one gets missed constantly. The cutting room spreads and cuts in whatever order is convenient, then the sew line wants styles in a different order. Now bundles sit in WIP and the first-station operator waits. Sequence the cut plan to feed the sew sequence, not fight it.
5. Keep a "setup distance" score per transition. Give each changeover a rough score — 1 (minor: color only), 2 (moderate: feet/guides), 3 (major: folders + needles + machine mix). When you lay out the week, add up the scores. If you can reorder to drop the total from 19 to 12, you just found hours without touching anyone's pace.
A simple scoring table you can copy
Here's a quick workflow to visualize sequencing, from cut plan to logged first-off.
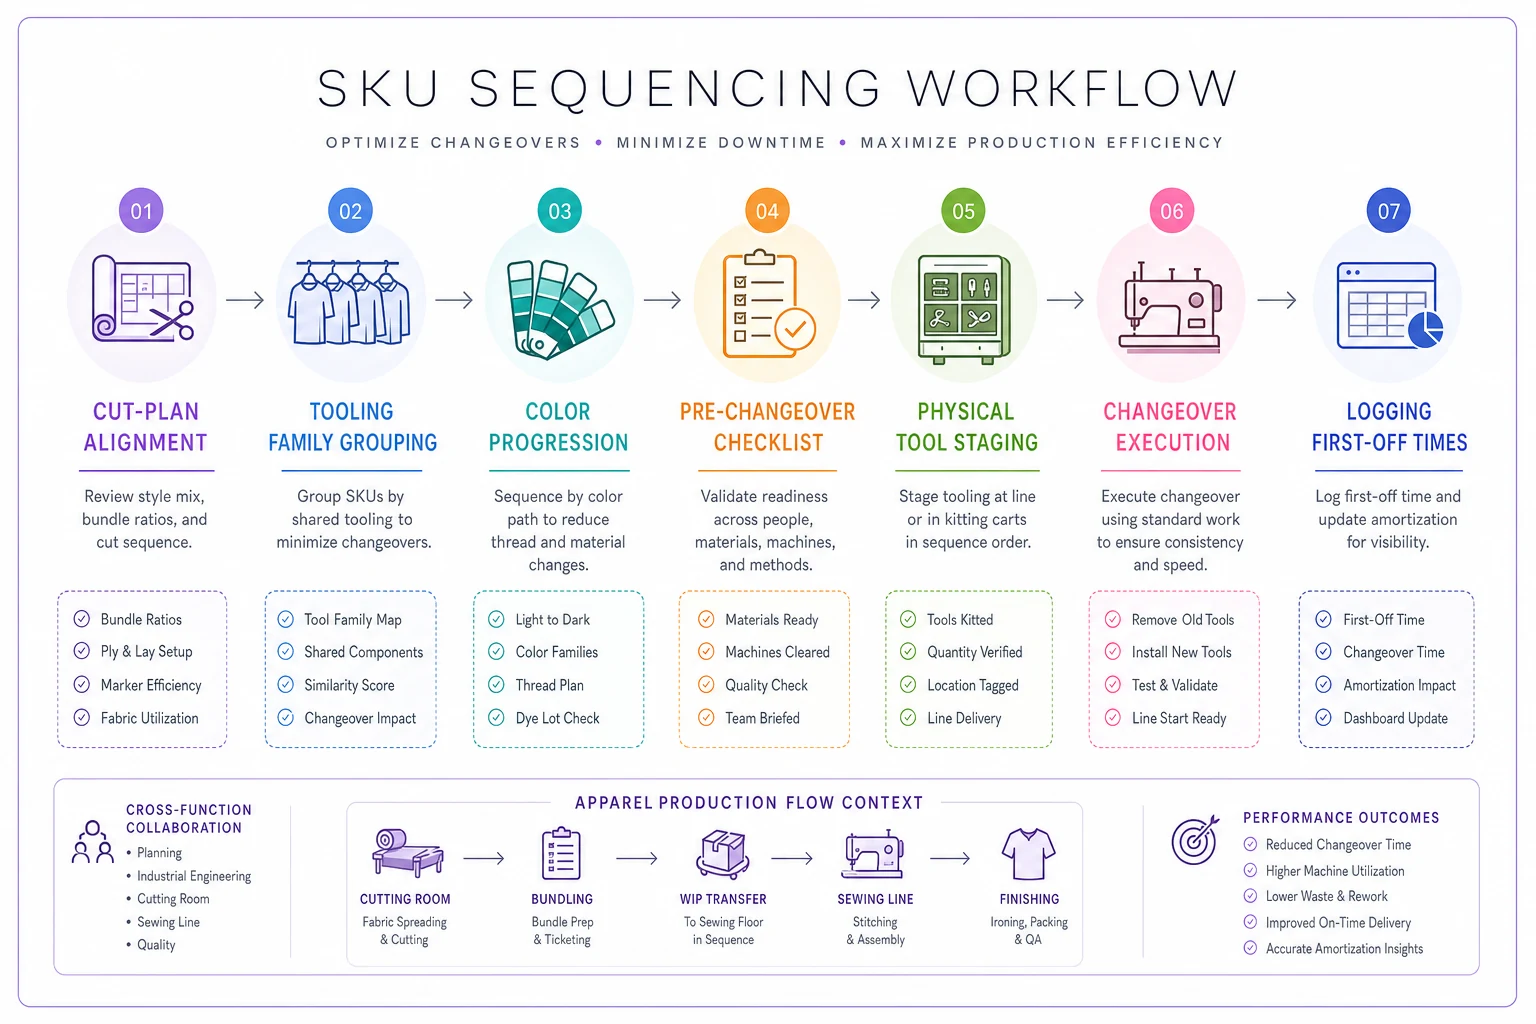
Use this flow to check sequencing decisions against tool availability.
| Change required between consecutive styles | Setup distance score | Typical line time |
|---|---|---|
| Thread color only | 1 | 10–15 min |
| Thread + feet/guides | 2 | 20–30 min |
| Folders/binders swap + re-time | 3 | 35–50 min |
| Full machine-mix + folder + needle change | 4 | 60–90 min |
| Orphan style (unique tooling) | 5 | 70–100+ min |
The planner's job isn't to hit zero — that's impossible. It's to avoid stacking three 4s and 5s in a row when a little reshuffling drops them into 1s and 2s.
Shared-tool checklists so the line isn't hunting at 7am
Even with good sequencing, setup time balloons when nobody knows where the folder is, whether it's the right one, or who had it last. Shared tooling — folders, binders, specialty feet, gauge sets, pressing attachments — tends to live in a shared drawer, a mechanic's toolbox, or "somewhere near machine six."
This happens when tooling is owned by nobody. It's shared, which means it's everyone's responsibility, which means it's no one's. The result: a line is fully set up and ready except for one binder that's still sitting on another line from last week's run.
A shared-tool checklist fixes this with almost zero cost. Two parts:
-
[ ] Confirm next style's tooling list pulled from the tech pack
-
[ ] All required folders/binders physically located and tagged with style
-
[ ] Specialty feet and gauges present and matched to needle size
-
[ ] Thread cones for next color staged at each affected machine
-
[ ] Marker/cut bundles for first 2 hours confirmed in WIP at station 1
-
[ ] Any tooling currently on another line flagged with a return time
Changeover confirmation (run at teardown):
-
[ ] Previous tooling cleaned and returned to labeled home location
-
[ ] Needles changed and old needles disposed per log
-
[ ] First-off garment inspected and signed before full run release
-
[ ] Setup end time logged against the SKU
Label tooling and color-code folders so operators can visually confirm matches during the pre-changeover check.
That last line matters more than it looks. Once you start logging setup end time per SKU, you can finally attribute real setup hours to real styles — which is the whole foundation for the amortization workbook below.
One pattern worth naming: factories that struggle most with tooling chaos are often the same ones dealing with broader coordination gaps. If your tooling walks off the line, there's a decent chance your WIP staging is loose too. The same discipline that keeps supplier handoffs clean — the kind covered in capacity-profiled design and failover playbooks — applies internally to how tooling moves between lines.
Setup-time reduction tactics that don't require new machines
Beyond sequencing and checklists, a handful of floor-level tactics consistently shave changeover minutes. None of these require capital. Most require agreement more than anything else.
-
Pre-set tooling off-line. Keep duplicate folders pre-threaded and pre-adjusted on a spare machine or bracket. When the line changes over, you swap a ready unit instead of adjusting in place. This is the apparel version of single-minute exchange of die — convert internal setup (machine stopped) into external setup (done while the line still runs).
-
Standardize needle and thread families. If three of your five bestsellers can run on the same needle size and thread weight with no quality loss, specify them that way at the tech-pack stage. Design decisions made months earlier determine how much setup you're locked into. Setup reduction starts in the tech pack, not on the floor.
-
Batch like-trims across styles. Bartack placements, buttonhole setups, and rivet positions that repeat across styles should be grouped so the specialized machine isn't re-set three separate times in a week.
-
Keep a changeover "kit" per style. A labeled bin with that style's folders, feet, gauge card, and a one-page setup sheet. New or rotating operators set up in a fraction of the time when they're not reverse-engineering the setup from the sample.
-
Log the first-off time, every time. You can't reduce what you don't measure. A single column — "minutes from last good unit of Style A to first good unit of Style B" — gives you a real changeover dataset within one season.
When aggressive setup reduction is a bad idea
Pre-setting tooling off-line requires duplicate folders, which costs money and storage. Standardizing needles and threads can constrain design in ways that hurt a hero product. If you run very long runs — a basics program where a single style runs for days — changeover is a rounding error and your attention is better spent elsewhere.
Setup optimization pays off most when you run many short-to-medium runs with high style variety. That's where the gaps between styles add up to real hours. A factory running four styles a quarter in large quantities shouldn't reorganize its entire planning process around changeover — it barely moves the number.
The season-level amortization workbook: finding true per-unit cost
Most costing sheets get this wrong. Tooling and setup are real costs, but they're shared across every unit that uses them. If you expense a $600 custom folder entirely against the first PO that used it, that PO looks unprofitable and every reorder looks artificially cheap. Neither number is true.
The fix is a season-level amortization workbook that spreads tooling and setup cost across the units that actually benefit from them.
Step by step:
-
List amortizable tooling per season. Custom folders, binders, specialty feet, custom cutting dies, embroidery setups, screen/print screens, specialty pressing attachments. Anything with upfront cost that gets reused.
-
Assign each tool to the SKUs that use it. A single folder might serve four styles. A print screen might serve one. This mapping determines who shares the cost.
-
Estimate the life of the tool. One season? Three? Some folders last years. Amortize across expected useful seasons, not just the current one. A $600 folder used across three seasons is really a $200/season cost.
-
Capture setup hours per SKU from your logs. This is where the first-off timing pays off. Convert logged setup minutes into cost at your loaded line rate.
-
Allocate. Per-unit tooling cost = (tool cost ÷ useful seasons) ÷ (total units expected to use it that season). Per-unit setup cost = (setup hours × loaded line rate) ÷ units in that run.
Worked example
-
Season amortization
$540 ÷ 3 ≈ $180 for the season
-
Expected units across the three styles this season
around 4,200
-
Per-unit tooling share
$180 ÷ 4,200 ≈ $0.043 per unit
Now setup. Those three styles ran with changeovers logged at roughly 30, 45, and 25 minutes. At a loaded line rate near $90/hour, that's about $150 in setup cost spread across 4,200 units — roughly $0.036 per unit.
Combined true tooling-plus-setup load: under 8 cents a unit. That sounds trivial — and that's exactly the point. The honest number is small because it's shared correctly. The mistake factories make is dumping the full $540 folder cost onto the first 900-unit run, which makes that run look 60 cents heavier per unit and poisons every pricing decision that follows.
Workbook column template
| Column | What goes in it |
|---|---|
| Tool ID / description | Custom collar folder #CF-03 |
| Tool cost | $540 |
| Useful seasons | 3 |
| Per-season cost | $180 |
| SKUs sharing tool | STY-101, STY-102, STY-103 |
| Expected units (season) | 4,200 |
| Per-unit tooling share | $0.043 |
| Logged setup minutes (per SKU run) | 30 / 45 / 25 |
| Loaded line rate | $90/hr |
| Per-unit setup share | $0.036 |
| True added per-unit cost | $0.079 |
Keep one row per tool, refresh it each season, and reallocate as reorder quantities change. The reallocation step is what keeps the number honest over time — as volumes grow, the per-unit share should fall, and your pricing should reflect that.
How sequencing and amortization reinforce each other
These two aren't separate projects. Better sequencing produces lower, more consistent setup times. Those logged setup times feed the amortization workbook. The workbook then shows you which styles carry disproportionate setup load — and that insight feeds back into next season's sequencing and even assortment decisions.
A style that scores a 5 on setup distance and sells in small quantities is carrying a heavy per-unit setup burden. Maybe you consolidate it with a sibling style. Maybe you reconsider the custom tooling. Maybe you accept it as a hero product and price accordingly. The point is you're deciding with real numbers instead of gut feel.
This is the same logic that applies when you're consolidating freight across batches — small, scattered units carry costs that only become visible once you allocate shared expenses properly. Setup and tooling behave exactly the same way.
A short real scenario
A small cut-and-sew operation running roughly 10–12 styles per season across two lines was quoting flat tooling costs into their first POs, then puzzled why reorders felt mysteriously more profitable than initial runs.
After building a sequencing score and a basic amortization workbook over one season, two things changed. By grouping styles into tooling families, their average changeover dropped from somewhere around 50 minutes to the low 30s — enough to recover close to an hour a day per line. And their per-unit costing stopped lying to them. Styles that looked unprofitable were actually fine; the setup cost had just been dumped on the wrong run.
Nothing exotic happened here. No new machines, no new hires. A planning rule, a checklist, and a spreadsheet with honest columns.
Where tracking tools help — and where they don't
The hard part isn't the math. It's capturing setup end-times reliably, keeping the tool-to-SKU map current, and re-running the allocation every season without it falling apart in a stack of versioned spreadsheets. That's where an operational platform earns its place — logging first-off times against each SKU automatically, keeping the amortization mapping tied to live reorder quantities, and flagging transitions that score high on setup distance before the week is released.
But the thinking has to come first. A system that automates a bad sequencing rule just makes you wrong faster. Get the heuristics and the workbook right on paper, prove they move your changeover numbers, and then let software remove the manual logging and reallocation grind.
Setup hours and tooling cost aren't overhead to be waved away. They're specific, attributable, and reducible — but only once you sequence with intent and amortize across the seasons and SKUs that genuinely share the load.
Ready to tailor your apparel operations?
Join 500+ fashion brands using GoTailo to accelerate product launches, reduce waste, and improve supplier collaboration.